Tuesday, November 1, 2011

Baby Quilt

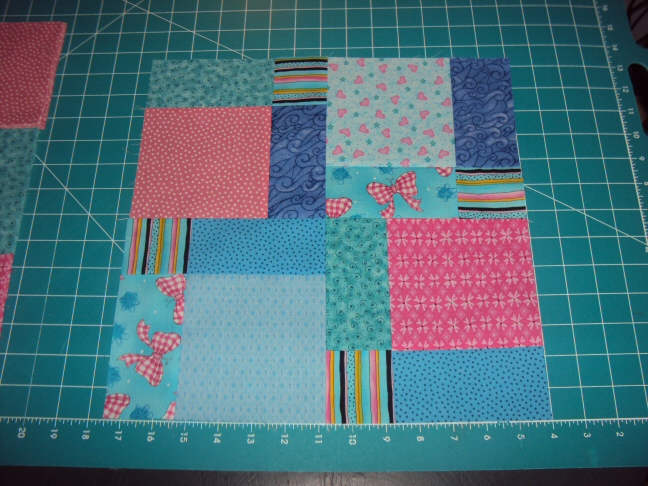
My best friend is due with her 2nd baby girl in November. I set aside the quilts I was making for my girls to work on a baby quilt for her. I chose the Sweetheart charm pack from Fat Quarter Shop for the quilt squares. I used one pack of squares, made the disappearing 9-patch square with the fabric, and instead of putting the 9-patch squares together, I kept them seperate. Then I added a pink border around each square with a mitered corner. I bought some polka dot fabric as my sashing between the squares. I love how this little baby quilt top turned out!

Here are some of the squares with the pink mitered corners. Not my favorite to make, but the end result looks so nicely finished!


The polka dot sashing between the squares.


And the final quilt top complete. The finished top measures 44"x44" with just one charm pack, some left over pink fabric, and a yard of polka dot fabric cut into strips.

Im still unsure what color to use for the binding, but I did order 1 1/2 yards of the pink flower fabric for the backing.


I finally got my darning foot in the mail from Sears. I practiced free motion top quilting with it. The top quilting was fine, but on the back of my quilt the stitches looked pulled to the side in some areas where I did a curve. Frustrating but I know it takes practice and I cant be perfect on the first try. I want to finish up this adorable baby quilt for my friend and get it mailed off to her, but I wont send a sloppy top quilted stitch just because Im anxious to get it mailed out.

In the meantime, I've been looking at a few other things to sew. I made this little handy scrap or thread caddy to hang next to me for my scraps and thread pieces.


Next up is a little purse with a zipper for my 8 year old. She's been wanting a little purse for a while now, so I thought I would sew one for her. She picked out her fabric (a green flower fabric for the outside, and a purple flower fabric for the inside), so this should be interesting lol.

Tuesday, October 11, 2011

New Quilting Area

Im here in CO, living with a roommate for now until I find a job out here. I have a bedroom and part of the downstairs area for my quilting setup. I forgot to take pictures of the swap mug rug and poochie bag I made for my swap partners before boxing them up and mailing them out >.< I thought they turned out really cute and I loved them =D

Here is my new quilting area, small but it works ~


I started some squares for my friends baby quilt Im making her. She's due in November with her 2nd baby girl. I decided to do the disappearing 9-patch quilt pattern, but instead of joining the 4 squares together, Im just using each square seperate and then adding borders around each square, and then putting in strips between those. Hoping it turns out well, just need to figure out what kind of fabric to use for the borders and strips!


Also the crochet hook holder I did with the purple fabric. I have yet to sew on the button. Its the little details that take me longest to do!


For now Im working on getting my sewing area set up how I want it so I can begin sewing again. I need to either borrow my landlords (roommate) ironing board and iron or I'll have to go buy one myself before I do any more sewing.

Friday, September 30, 2011

Moving to CO!

I'll be moving out to CO next week, I'm so excited! My girls live there with my ex-husband, so I'll be moving out there and looking for a job. My husband will stay behind for now and pay for my roommate rent while Im out there, and then he'll move out there once I get a job and we can get a place. I can't wait to be able to see my girls more often than just twice a year.

So my sewing will have to be put on hold for just a little bit. I did, however, finish up the mug rug and poochie bag pieces for my swap at swap-bot.com. I'll post pics as soon as I get a package together for my swap partners to mail out. Then it's packing and driving to CO. I'm so excited!!

Sunday, September 18, 2011

Disappearing 9 patch

I love the disappearing 9 patch square pattern! Im using this pattern to make my 13 year olds quilt with mostly blue fabric, with some pink and brown fabric to go with it. I will also be using this pattern to make my best friend a quilt for her baby that's due soon. I purchased a charm pack with 42 5" squares for the baby quilt, which will be so much easier than all the square cutting I did for my daughters quilt.

Here's the fabric Im using for my daughter's quilt, and one of the squares I put together.


Very easy pattern to put together!

I rescued a basket from being thrown away today! My mother-in-law was going to throw out this basket and I whisked it away and said this will be a perfect scrap basket for my fabric scraps! I've been looking for something other than a plastic bag to put my scraps in!


So I was browsing through some quilting blogs last night and my cat Fritz apparently decided I wasnt paying him enough attention so he jumped up onto my desk and made himself right at home!


Thanks! Just the view I wanted to see. Silly cat.

Saturday, September 17, 2011

Poochie Bags and a drink!

Worked on a couple of sewing projects today. I started out with making a poochie bag for my mother-in-law. She has so many bags for everything you can think of, so I thought "why not? Let's give her yet another bag!". She loved the black squares fabric so I put these fabrics together to make her bag:

I used the blue fabric for the handles, the black and white flower fabric for the bag lining and pockets, and the black squares fabric with the flowers and butterflies for the main fabric.

When attaching your handle straps together to make a longer strap, do NOT do what I did: CAUTION this is the WRONG way to sew your handle pieces together!


Yeah, I knew better than to start sewing before I had my caffeine this morning! Good thing I had extra fabric.

Because Joanns sells their fabric quarters in 18"x21", I had to cut my fabric 10 1/2" x 9" instead of 10 3/4" x 9" - I dont think it made a huge difference, but why does Joanns fabric only give us 21" off the center cut? So strange.

After a few seam rips, I finally got it right and am excited to make more! I top stitched the pocket 1/4" as well as the top of the bag 1/4" all the way around. I think it gives the bag a more finished look.


Finished bag measures approx. 9 1/2" x 9 1/2" and 4" deep. My mother-in-law wanted a large depth on the inside for whatever she decides to use this bag for. I think I prefer the 2" deep bag size.

I also made a crochet hook holder in the purple flower fabric that I used for my zipper pouch. I made a fabric button in the same fabric as the lining, and will post pictures of it tomorrow after I get the button sewn on.

I ended up with a huge headache today which only got worse when bending over my sewing table. Im not sure where it came from, but it hit hard and fast. So I end the day with a nice fruity drink and some relaxation time.


Until next time!

Friday, September 16, 2011

New fabric and a zipper pouch

Today was a fabric shopping day! First I headed over to Sears to see if they carried any darning feet in-store, my store does not, so Im going to have to order it online. Just pushes my top stitching practice out a few more days, and in the meantime I have plenty of projects I want to work on.

Then I headed over to Joanns and Sew Much Fun quilt shop for some fat quarter fabric. Bought a nice selection of fabrics to make some potholders (to practice top stitching), zipper pouches, mug rugs, and poochie bags. I joined a couple of swaps over at swap-bot, the first is a mug rug swap (which will be my first mug rug but I hear they are addicting!!), and the other is a poochie bag swap. I am excited to make my first mug rug and poochie bag!

Here is today's fabric purchase. My favorite <3 is the purple flower fabric which I used to make myself a zipper cosmetic pouch with.


Im going to use the brown rooster fabric with the brown circle fabric to make my first mug rug. And I've already picked out a few fabrics to make my first poochie bag with!

Here is my zippered cosmetic bag I made for myself this evening. It was a very fast project to work up, and is my first ever sewn zipper project! I will certainly be making more of these! I used the warm and natural batting I already had on hand instead of buying the fusible fleece, and it worked just as nicely since the fabric clung to it very well. Not buying the extra fleece left more money for more fabric ^_^


The inside lining of this pouch is the same fabric I used for my daughter's edging in her fun and funky quilt =) The two fabrics go very well together with a purple zipper to match.

Im having so much fun getting back into sewing! Next on the list is the poochie bag with some of the black patterned fabric I purchased. Stay tuned!

Thursday, September 15, 2011

If you read or have read my posts from 2008 you will see that I had started my daughters Fun and Funky quilt (aka Spring Fever pattern from Fourth & Sixth Desings) and had completed 5 squares and cut all of her fabric into strips before things were packed up for the move out of Cali. Those squares stayed packed up for the next 3 years... until last week!

Im amazed at myself at how quickly I finished her quilt top, complete with borders! Here's a picture preview of the progress of the quilt starting 3 years ago..


Finished today, folded and set aside until Im ready (and practiced!) at finishing it with batting, backing, and binding it together.

And I will leave you with one more picture. You can see throughout my blog that my cat Fritz very much enjoys being in the middle of my crafting and sewing space. So I leave you with this most recent photo of Fritz doing what he enjoys most, sleeping on my fabric.


MommaChelle Quilts is back! It's been a few years, and much has changed over those years! Divorce, moving to a different state (and coast!), getting re-married, finding myself again.

I've been doing a lot of sewing for my girls, and recently pulled out those old quilting squares and started quilting again! Im still a beginner, make quite a few mistakes, and learn along the way.

I invite you to journey along with me as I create more quilts, learn new techniques (like free form quilting), follow along with my first baste and binding, and more. I like to start out big and jump right into it, but Im learning that I really need to work small and go from there. I wanted to immediately create twin size quilts for my 3 girls, and while the quilt squares are going well, it's a big project to start with. I still have to learn the best way to baste the 3 layers together (pinning or spray? on the floor or on the wall?), make my own binding strip, and then machine bind the edges.

Yeah, maybe I'll make a few potholders before I attempt to finish this twin size quilt I started 3 years ago for my daughter!

Thursday, April 10, 2008

A NEW Knitting/Crochet Holder!

I dont really use those really long knitting needles, so I thought I would make a smaller size for the needles and crochet hooks that I DO use. I also added more of the bigger pockets that I said I would be adding.

I love these fabrics! This one will be mine, definitely! I still have to add the ties to this one too, which I will do today. So, I call the other holder my large knitting/crochet holder, and this one my medium holder.


I have tons of fabric here, and these holders are a perfect way to use up that fabric! Also, I finally have a place to hold my needles so they dont get lost and I forget what size the circular needles are because I could never remember to put them back into the bag they came in (what a pain!). I do have a needle sizer somewhere around here. That will go into my holder once I find it as well.

This one is also padded with some batting. The pocket stitches are sewn onto the batting to cushion the pockets for the needles/hooks.

Time to put another holder together! Which one is the better size to make do you think? Im thinking the medium holder?

Knitting/Crochet Holder

I thought I had published this post a few days ago? But it's not showing up here, so I guess I will have to try posting it again!


April 8, 2008

I finally started sewing again yesterday! And I didnt stop until 3:30am this morning. Over doing it a little? :o) I have been wanting to create a knitting needle case/roll for a while now. Well yesterday my new set of needles came in the mail from knitting-warehouse.com, so that put me into action creating a needle roll!

I used fabrics that were on hand, measured my longest needles (who uses those these days anyways?) and made my first needle roll! I used thin batting for cushion, and all I have left to do on it is make the ties and sew the opening closed!

I have more fabric ready to go for my next roll!


I put the circular needle information in the pockets with the needles, to recall what size they are. I dont understand why the companies cant add a little something somewhere to the circular needles stating what size they are?

Since this is my first roll, Im already looking to improve my next one. I will have 9 bigger pockets (2 on the right on each pocket top to bottom for 6 big pockets, and 1 on the left for each pocket for 3 more big pockets). There's also room for my crochet hooks as you can see. But I need more of the bigger pockets since I am overlapping my circular needles, and I need room to put my measuring tape and scissors.

Yes, I plan on selling these. I cant understand why some people (on etsy) sell either a circular roll or a straight needle roll, and you are paying near $30 for each of them - instead of having 1 roll to hold both?

Thursday, March 13, 2008

Addicted

Hello! I am still around! Fighting off another cold. I was in the clear for about 4 days and then I caught a different strand of it :-(

My daughters got me hooked on toontown! I know, a 30 year old woman playing a childs cartoon game! But it is so addicting!! I played it all day yesterday and all day today. There are missions to complete and things to buy for yourself or for gifts for others using jelly beans to pay for it all. So, I've been caught up in that!

I have 2 purses 3/4 done on my sewing table, with matching zip up pouches in the works and all I can do all day is play an online game. It really is relaxing actually - especially since I've been sick and coughing my lungs out and cant breath out of my nose.

If anyone wants to check it out and join me LOL let me know! :-)

My husband and I just watched a launch go off here from Vandenberg Air Force Base - a Atlas V launch. At 3 am in the morning, it was awesome to watch! I've seen many launches in the 4 1/2 years we've been here, but we actually watched one where it was dark enough and where we were actually awake to go outside to see it. There have been launches in the dark before, but we have always been in bed and no way were we going to get up and out of bed just to watch a launch.

But I have to tell you, my husband and I just stood there watching the twinkle of the light from the launch go up into space. Up and up and up for over a minute - and then we saw it break apart (the engine that sent it up) and it was awesome to see the second burst of flame coming from it as it boost it up again.

Very pretty and I wish I would have grabbed my camera on the way out the door, but it probably wouldnt have focused very well anyways.

If you ever get the opportunity to watch a launch in the dark, I would highly recommend it. Especially when all the stars are out and you can see the stars with the launch and the twinkle of light and flame burst.

Well at 3:30 in the morning, it's time for me to head to bed! Poor hubby will only get 4 hours of sleep before getting up and running 3 miles before work. He works in Space System Operations with satellites and missiles - too cool :-)

Thursday, March 6, 2008

Too many ideas!!

I have so many sewing ideas and not enough time in the day! I havent even finished one quilt yet and already Im thinking about more dolls, and even quilted purses/bags!

Im going to be starting my first bag tonight after I check out the fabric store, and yet while I wait to go I want to create another doll. But I have a dilemma - I cant seem to get off the internet!

Priorities Chelle LOL

Monday, March 3, 2008

It works!

After Joanna's suggestion of using a table cloth (the vinyl ones with the fuzzy backing), I pulled my table cloth out of the drawer that I had bought for like $2, pinned it to my wall, and put my squares on it. They've been there for 2 hours now and they havent fallen off once!!


Thank you girl!!

Ok I Get It

After doing a google search for quilting wall and finding nothing, I went back to Barbara's blog to see what she called it. OH! It's a design wall! Makes sense :o) So I googled design walls and read some websites on it.

I see that you need flannel (or flannel sheets) to stick your squares onto. Why does batting not work? It works for a few minutes and then the squares fall off.

Hey, check out this quilter's little studio her husband made her!!

http://community.webshots.com/album/511888120qJpqda

Help!

Ok, so I wanted to make a quilting wall so I could put up the squares of my daughter's quilt so I could see everything at once and decide what other color combos I needed. So I go to walmart and pick up some batting to thumbtack to my wall. My squares kept falling off!

What am I doing wrong?

Saturday, March 1, 2008

Fabric Strips

This wave of intelligence washed over me this morning LOL I realized I should cut all of my fabric for the quilt into strips so when I am ready to work on it, I can just grab the three fabric choices I want and start working! This makes it so much easier!

My husband gave me a great tip while I was cutting the fabric with my rotary cutter. He said that the fold should be at the beginning of where I cut so I cut outward toward the open edge instead of cutting toward the fold since you push against the fabric upward slightly when you cut.

Anyways, I kissed him for his stroke of genius :o) He's also the one who showed me how I can get my 45 degree triangles for my 4 triangle squares off of my rectangular ruler instead of going and spending $12 on a triangle 98L ruler. Now Im cutting like a quilter! :o)

Fun & Funky

I bought a pattern the other day at the fabric store when I got my yummy fabric for my 9 yr olds quilt. The pattern is called Spring Fever by Fourth and Sixth Designs. I really dont like the color combinations they used for the quilt on the front of the pattern. The colors blend in too much together. They had the quilt at the fabric store put together in better colors, and because of that is the only reason why I purchased the pattern.

Last night I put together 2 squares of my 7 yr olds quilt. WOW it's such an easy square to do and it goes so fast I can have my daughters quilt put together in no time! I am using this same pattern for my other 2 daughter's quilts but in different colors.

Here are the two squares I finished last night:


My 7 yr old picked out the fabrics for her 3rd square which I will be starting on today. Funny, the weirdest designs that I wouldnt have picked otherwise really look good together in the squares!!

Now I need a quilting wall :D

In other news, Fritz has found himself a new napping place while I sew. Silly boy.


I hope everyone has a great weekend!

Friday, February 29, 2008

Stars

The star squares are done!! I have the edging to do in light blue and dark blue strips, and then I have the border to do in the dark green. Pin it to batting and backing and quilt it!


What do you do when you have a huge quilt wider than the 44" width of fabric? Do you piece backing squares together?

Sewing Area

I was going blog hopping today and I noticed people posting photos of their ironing board and work area! Thankfully I had just cleaned off my sewing area last night when my friend came over. Haha, that reminds me - when ever I go around cleaning the house or do all of the dishes (or even if I just get dressed and look nice) my kids ask "is someone coming over?" or "are you going somewhere?" Guess Im that predictable! Anyhow, back to my work space. It was pretty messy yesterday with 3 projects going on at once! It feels nice to have an open clean area again. A messy workspace just turns me away from creating anything.


You cant have a true sewing area without your kitty around! Unfortunately, the only reason Fritz likes to be on my ironing board is so that he can play with the ribbon hanging down from my harlequin masks! Good thing we teach all of our cats/kittens the word no starting at 4 weeks old! Fritz has to have a harsh "NO!" and then he looks at me like "what did I do?". Otherwise, if it's a soft no, he'll keep doing it cause he thinks he's a spoiled kitty :o) which he is - but dont tell him I said so!

I keep the cup on my table for all of my thread ends or little scraps/trimmings of fabric. With a kitty around, you have to keep your work area and floor free from any thread! Dont want the kitties swallowing any - especially any nylon threading I think it is. Ever watch animal rescue shows? Scary!

Im off to make some more ohio star squares! Question, the quilting walls (or whatever they are called) - is that just some batting on the wall or is it something else?

Fabric!!

I got some yummy new fabric today!! I got this fabric for my 9 yr old's quilt. The 4 pieces on the sides are the fabric I already had from a different fabric store, and all the squares in the middle are the new squares I got today. YUMMY!! I also bought the quilt pattern that Im going to use for all 3 girls quilts - same design/pattern, different fabrics.


I also finished 2 more star squares for my dad's quilt today. Only 3 more squares left to do!

Update on my hospital visits. Seems everything is ok! The pain was most likely from the fluid around my ovary, some of it leaking and irritating something inside that made my pain. I have 3 cysts on my right ovary with 1 on my left. Cysts are supposed to go away naturally. So all I have to do is just check in each year to get them checked out and make sure everything is still ok! I had pain last year from a cyst, so as long as it's only yearly then Im ok!

Thanks for the support!!